PUE 7.1 Weighing Terminal
Radwag – Laboratory and Industrial Weighing Solutions
Selected language English
PUE 7.1 Weighing Terminal
This image is for reference only.

PUE 7.1 Weighing Terminal

Product code: WX-008-0025
Change the model (2)
close
Change the model:
PUE 7.1 Weighing Terminal
PUE 7.1P (panel) Weighing Terminal
Select all
Show me
Download
Overview

PUE 7.1 Weighing Terminal

 
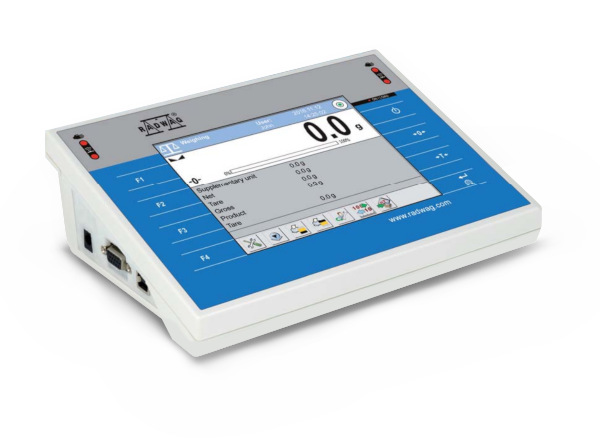
The PUE 7.1 terminal is a constructional component of industrial load cell scales.


Ergonomics and Comfort of Operation

It is equipped with 5.7" TFT display featuring a touch panel and a membrane keypad.

The device offers two proximity sensors which can be programmed using the menu. It can connect with maximum 2 weighing platforms, a barcode scanner, a printer, a labeller, RFID reader and PC equipment (mouse, keyboard, USB flash drive). Standard PUE 7.1 terminal communicates with 1 weighing platform, and is provided with an extended communication interface offering 2×USB, 2×RS 232, Ethernet, 4inputs/4outputs (digital), Wi-Fi®.
 
It is possible to expand the PUE 7.1 terminal with 1 extra platform, this is done by installation of an additional platform module, DP-6.


Caution: in case of a terminal supporting 2 weighing platforms, only cable version is available (/R version does not exist).


Wi-Fi® is a registered trademark of Wi-Fi Alliance®.
Datasheet
OIML Class

III


Maximum quantity of verification units

6000 e


Minimum volatge per verification unit

0.4 µV


Maximum voltage per verification unit

3.25 µV


Minimum load cell impedance

50 Ω


Maximum load cell impedance

1200 Ω


Load cell excitation voltage

5V DC


Maximum increase of signal

19.5 mV


Display

5.7” Resistive Color Touchscreen


Device dimensions

206×140×71

 mm

Packaging dimensions

300×250×130

 mm

Net weight

0.6

 kg

Gross weight

1.2

 kg

Protection class

IP 43


Keypad

touch screen


Housing

ABS plastic


Database capacity

16 GB (micro SD)


Operating system

Linux


Processor

quad-core 64-bit Cortex-A53 1.2 GHz


Memory

RAM 1GB LPDDR2


Data memory

16 GB (micro SD)


Communication interface

2×RS232, 2×USB-A, Ethernet, 4 IN / 4 OUT (digital), Wi-Fi®


Additional DP6 A/C converter module

1 (option)


Power consumption max.

max. 1 A


Operating temperature

-10 – +40

 °C

Relative humidity

10% – 85% RH no condensation


Number of buttons

8


Max number of platforms

2


CE
Videos
Complete Solutions for Mass Measurement in Pharma Industry
Functions
Dosing

Dosing

Weighing process for which reference mass has been determined together with tolerance for its determination. Dosing tolerance is given in [%] and it is calculated in relation to the reference value thus being a permissible deviation of this process. This solution is used for weighing powders, liquids and loose materials. Dosing function performance is often supported with bargraph - load indicator. For industrial scales it is possible to use a control systems of dosing process.
Labelling

Labelling

Marking products with the right symbols contributes to quick and reliable identification. The balance/scale usually transfers product mass or product quantity to the label printer. The transferred value is printed with the following information: bar code, pictogram, content, address etc. In laboratory the labelling is performed in a semi-automatic mode, for industry in an automatic one (dynamic scales).
Plus/Minus Control

Plus/Minus Control

Control of sample's mass carried out with reference to specified MIN and MAX thresholds. The weight is considered to be correct if it is comprised within threshold values. A graphic visualisation of weighing result is displayed in a form of a bar graph.
Percent Weighing

Percent Weighing

Percent Weighing function is used for comparision of measured products with mass standard. Mass of a mass standard may be a numeric value taken from a database or it may be determined through a measurement process. Each measured product is compared to mass standard, mass of which is presumed as a model 100% ideal mass. For products weighing less than the mass standard, obtained results are lower than 100%, for products weighing more, the obtained results are greatly  exceeded.
Totalizing

Totalizing

Function adding new mass value to already obtained one. This allows to determine mass content of the mixture, being a composition of number of different consistence components. Totalizing is limited by maximum capacity parameter.
Parts counting

Parts counting

Function using mass measurement for determination of  measured items quantity. Mass of a single item is required for this process. It may be either estimated through weighment or taken from a database. For items counting the following algorithm is used: all items mass / single item mass = quantity. Function operation is supperted by a mechanism of Automatic Correction of Accuracy. This allows to update single item mass in course of the process. To a certain extend Automatic Correction of Accuracy eliminates error which may be a result of different mass values of seemingly alike single elements. For industry solutions items counting may be simultaneously carried out with checkweighing and dosing thus industry solutions feature audio signalling base informing that specified number of items has been weighed. It is possible to apply weighing systems using few platfroms of different MAX capacities and different accuracies.
Peak hold

Peak hold

Function registering the greatest temporary indication occurring in course of the weighing process. It is most often used in medical scales in order to hold the measurement indication.
Formulation

Formulation

Function supporting the mixture making process, wherein the mixture contains various components. Formulation function usually uses the balance/scale database of components. Formulation serves for monitored checkweighing of every single component with a given tolerance. It is enriched with a set of individual settings.
Statistics

Statistics

Statistiscs function registers and analyses performed measurements. This supplies the user withthe following information: Max and Min standard deviation, average value, variance, range et.
Checkweighing

Checkweighing

Checkweighing function is used for checking whether the measured sample mass is within the predefined threshold values, Low [LO] and Hgh [HI]. The thresholds are given in [g] and [kg] units. Current state of a sample being measured is signalled by means of pictorgams located on a display for laboratory balances, for industrial scales Stackligt System is used. This visual +/- inspection is in operation during segregation, control or packing process of products for which mass has bees determined with a specifaied tolerance, eg. 12860 g 961
IR sensors

IR sensors

Programmable function supporting the weighing process through control of the following options: sliding weighing chamber doors, printout, zeroing, tarring etc. Especially appreciated wherever preventing the balance from soiling is important.
Animal weighing

Animal weighing

Process of mass determination for a product which may unwillingly reposition within the weighing pan. Mass determination in such cases requires much longer period of time when compared to typical weighing process. It is the user who defines period of time needed for control of measured product mass. The user can thus optimize the function depending on the measured product characteristics.
Differential weighing

Differential weighing

Differential weighing informs about mass variation a particular sample, wherein the said variation is a result of manufacturing processes.

Differential weighing is often applied in product control process, for which reference product parameters have been specified in order to be used as a source of comparison for the whole series.
Insuchcasestandard deviation is the information which tells about quality and completeness of a final product. For systems based on a feed-back technique such information may be used by control units.
ALIBI Memory

ALIBI Memory

"ALIBI" memory enables saving and storing up to 100000 measurements.  Measurements are saved automatically upon each pressing of the key. There is no need for any additional operations or changing settings.
The following data related with the measurements is saved: measurement date; measurement time; result (mass); tare value; operator carrying out the measurement (logged in); product name.
The software saves the measurement in a so called loop, i.e. when the measurement no. 100001 is saved, the measurement 1 gets automatically deleted from the memory.
Measurements saved to balance memory cannot be deleted.
You can preview and print out the data saved to the ALIBI database.
Documentation
Datasheet
Data Sheet Data Sheet
Data Sheet

Show me
Show me
Download
Download

Choose more product:
Show me Show me DownloadDownload
User Manuals
Software Manual - CBCP 03
Show me
Show me
Download
Download
(0.23 MB)
Start up Guide
Start up Guide
Show me
Show me
Download
Download
(1.26 MB)
Software Manual - Appendices 01
Show me
Show me
Download
Download
(1.81 MB)
User Manual - PUE 7.1
Show me
Show me
Download
Download
(1.73 MB)
Software Manual - PUE 7.1
Show me
Show me
Download
Download
(6.55 MB)
Conformity Declarations
Conformity Declaration
Show me
Show me
Download
Download
(0.04 MB)
Publications and Brochures
PUE 7.1 Terminal
PUE 7.1 Terminal
Show me
Show me
Download
Download
(2.33 MB)
Accessories
R-LAB

Accessories

Additional modules

Audit Trail3
RES Radwag Extended SI Module3
Workflow - additional module3
RDA (RADWAG Data Access)3

Newsletter

Subscribe to the newsletter if you would like to receive RADWAG news.

View more
Radwag Balances and Scales
Torunska 5
26-600 Radom
Poland
tel.: +48 48 386 60 00
e-mail: export@radwag.com
TIN: PL7960000327
Vimeo Radwag YouTube Radwag Facebook Radwag LinkedIn Radwag
© 2024 RADWAG Balances and Scales. All rights reserved.

Select language

×
Change language AlbanianAlbanian
Change language DanishDanish
Change language NederlandseNederlandse
Change language EstonianEstonian
Change language FinnishFinnish
Change language HungarianHungarian
Change language IcelandicIcelandic
Change language KazakhKazakh
Change language LatvianLatvian
Change language LithuanianLithuanian
Change language MacedonianMacedonian
Change language NorwegianNorwegian
Change language PortuguesePortuguese
Change language RomanianRomanian
Change language RussianRussian
Change language SlovakSlovak
Change language SlovenianSlovenian
Change language SwedishSwedish
Change language UkrainianUkrainian
Change language SerbianSerbian
Change language MontenegrinMontenegrin
Change language page on Deutsch Deutsch
Change language page on Español Español
Change language page on Français Français
Change language page on Italiano Italiano
Change language page on Polski Polski
Change language page on Türkiye Türkiye
Česky
Português (Brasil)
Change website to USA USA
Change language page on 中文 中文
Presentations Presentations Presentations
Subscribe Subscribe Subscribe
Radwag in Facebook Radwag in Facebook Facebook
Radwag in YouTube Radwag in YouTube Youtube
Radwag in Vimeo Radwag in Vimeo Vimeo
Radwag in LinkedIn Radwag in LinkedIn LinkedIn
Webinars Radwag Webinars Radwag Webinars
close
E-mail:
Company name:
Name:
I consent to the processing of my personal data for marketing purposes by Radwag Wagi Elektroniczne Witold Lewandowski.
I consent to receive marketing and product-related messages by electronic means from Radwag Wagi Elektroniczne Witold Lewandowski.
I have read the Privacy Policy of RADWAG Wagi Elektroniczne Witold Lewandowski.
lock_openI want to access the files
close
Slide to go back ↩
close