AS 60/220.R2 PLUS Analytical Balance
Radwag – Laboratory and Industrial Weighing Solutions
Selected language English
AS 60/220.R2 PLUS Analytical Balance
This image is for reference only.

AS 60/220.R2 PLUS Analytical Balance

Product code: WL-104-1052
close
Change the model:
Select all
Show me
Download
Add to compare Advanced search
Overview
 

AS 60/220.R2 PLUS Analytical Balance

 
Balance of the AS R2 PLUS series is a standard analytical weighing device of the SYNERGY LAB line. The AS R2 PLUS is exceptional due to a range of modern constructional and system solutions that guarantee reliability, precision and accuracy of measurement, and make everyday operation easy.


Ergonomic Mechanical Design

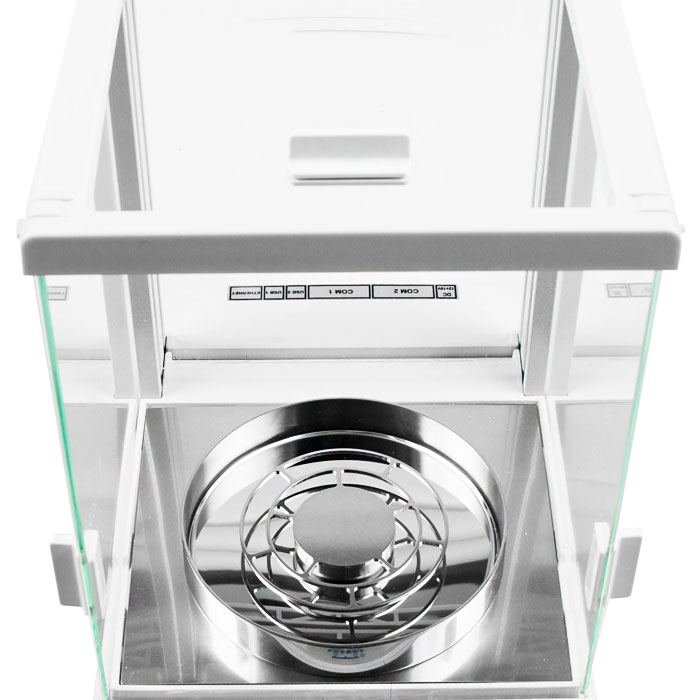
The latest AS R2 PLUS analytical balance features spacious weighing chamber, and the open-door clearance facilitates easy access to the weighing pan. With this it is possible to use laboratory glassware of various sizes. New aluminium base is a guarantee for weighing system stability.

Dual-CLICK system allows tool-free assembly and disassembly of the weighing chamber, and a special design of guides for weighing chamber panes (no rims) makes keeping the device clean convenient.

Innovative construction solutions increase balance durability and reliability in long-term operation.


Levelling System

Standard AS R2 PLUS balances are equipped with a levelling device located at the front of the weighing chamber, which facilitates level control. Levelling operation is now simplified and easier due to the reduced quantity of adjustable supporting points (2 points).


Intuitive Operation

Balances are equipped with LCD display ensuring clear presentation of the weighing result. Direct access to functions and databases is possible via the following keys:
  • Database – direct access to databases,
  • Function – direct access to basic functions,
  • F1-F4 – programmable function keys and menu navigation keys.
AS R2 PLUS analytical balances signal operated working mode, computer connection, weighing and service functions via pictograms. The quantity of displayed weighing units is also expanded. Dedicated status bar enables display of additional messages, e.g. product name, tare value. Real-time mass measurement is presented using bar graph.
 
Internal Adjustment
Modernized internal adjustment system guarantees accurate indications in extremely unfavourable conditions.


Data Protection

Access to valuable information is possible after logging. The administrator manages the data access configuration.

ALIBI Memory

Data safety is ensured by the ALIBI memory integrated into AS R2 PLUS balances, which enables record of up to 100 000 weighings. ALIBI guarantees continuity of data collection over a long period of time.


Databases

The information system is based on 5 databases, which allows several users to work with several product databases, and the registered weighing results can be subject to further analysis.
 
The data is registered in 5 databases:
  • operators (up to 10 users),
  • products (up to 1000 products),
  • weighings (up to 5000 weighings),
  • tares (up to 100 tares),
  • ALIBI memory (up to 100 000 weighings).


Communication Interfaces

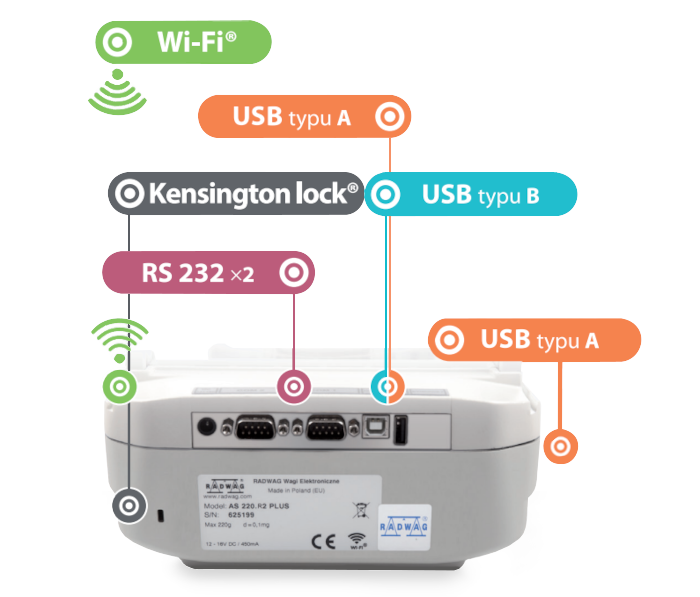
The functionality of AS R2 PLUS balances can be expanded using the following communication interfaces: USB-A, USB-B, RS 232, Wi-Fi® (option).


Additional option:
Under-pan weighing
Weighing instruments purchased after 15th February 2023 will allow under-pan weighing at any time after the purchase. All you need to do is just to order a dedicated hook.
 
 
Stainless Steel in RADWAG products
Learn about the use and maintenance of stainless steel products:
Stainless Steel in RADWAG products. Standard and special applications

Wi-Fi® is a registered trademark of Wi-Fi Alliance®.
Datasheet
Maximum capacity [Max]

60 / 220

 g

Minimum load

1

 mg

Readability [d]

0.01 / 0.1

 mg

Verification unit [e]

1

 mg

Tare range

-220

 g

Standard repeatability [5% Max]

0.012

 mg

Standard repeatability [Max]

0.08

 mg

Standard minimum weight (USP)

24

 mg

Standard minimum weight (U=1%, k=2)

2.4

 mg

Permissible repeatability [5% Max]

0.02

 mg

Permissible repeatability [Max]

0.1

 mg

Linearity

±0.05 / 0.2

 mg

Stabilization time

2

 s

Adjustment

internal (automatic)


OIML Class

I


Leveling system

manual


Display

LCD (backlit)


Weighing chamber doors

manual


Delivery components

Balance, weighing pan, weighing pan shield, centring ring, bottom cover, power supply, fabric dust cover.


Weighing pan dimensions

ø90 open-work pan + ø85 (option)

 mm

Packaging dimensions

545×455×575

 mm

Net weight

7

 kg

Gross weight

10.5

 kg

Protection class

IP 43


Communication interface

2×RS232¹, 2×USB-A (interchangeable), USB-B, Wi-Fi® (option)


Power supply

Adapter: 100 – 240V AC 50/60Hz 0.6A; 12V DC 1.2A
Balance: 12 – 15V DC 0.4A max


Power consumption max.

3 W


Operating temperature

+10 – +40

 °C

Relative humidity

40% – 80%


CE
Verification Extra payment
for verification

Repeatability is expressed as a standard deviation from 10 weighing cycles.
Stabilization time depends on the ambient conditions and the dynamics of weighing pan loading; specified for FAST profile.

1 Barcode scanners, available as weighing instrument accessory, communicate with the instrument via RS232 interface exclusively.

Videos
Easy Printing with Wi-Fi® Thermal Receipt Printer by RADWAG.
Connecting RADWAG RTP-UEW80 Printer via Wi-Fi® (Tutorial)
AS X2 PLUS Analytical Balance Unpacking and Installation (Tutorial)
RTP - The First Receipt Printer of RADWAG Production!
Complete Solutions for Mass Measurement in Pharma Industry
R Series Laboratory Balances
Functions
Autotest

Autotest

Diagnostic function aiming at metrological parameters determination (repeatability), the parameters are determined for the actual conditions of use. When speaking of repeatability it may be also used for weighing time optimization. Autotest is operated in an automatic mode thus operator’s time is saved.
Dosing

Dosing

Weighing process for which reference mass has been determined together with tolerance for its determination. Dosing tolerance is given in [%] and it is calculated in relation to the reference value thus being a permissible deviation of this process. This solution is used for weighing powders, liquids and loose materials. Dosing function performance is often supported with bargraph - load indicator. For industrial scales it is possible to use a control systems of dosing process.
Percent Weighing

Percent Weighing

Percent Weighing function is used for comparision of measured products with mass standard. Mass of a mass standard may be a numeric value taken from a database or it may be determined through a measurement process. Each measured product is compared to mass standard, mass of which is presumed as a model 100% ideal mass. For products weighing less than the mass standard, obtained results are lower than 100%, for products weighing more, the obtained results are greatly  exceeded.
Totalizing

Totalizing

Function adding new mass value to already obtained one. This allows to determine mass content of the mixture, being a composition of number of different consistence components. Totalizing is limited by maximum capacity parameter.
Parts counting

Parts counting

Function using mass measurement for determination of  measured items quantity. Mass of a single item is required for this process. It may be either estimated through weighment or taken from a database. For items counting the following algorithm is used: all items mass / single item mass = quantity. Function operation is supperted by a mechanism of Automatic Correction of Accuracy. This allows to update single item mass in course of the process. To a certain extend Automatic Correction of Accuracy eliminates error which may be a result of different mass values of seemingly alike single elements. For industry solutions items counting may be simultaneously carried out with checkweighing and dosing thus industry solutions feature audio signalling base informing that specified number of items has been weighed. It is possible to apply weighing systems using few platfroms of different MAX capacities and different accuracies.
Peak hold

Peak hold

Function registering the greatest temporary indication occurring in course of the weighing process. It is most often used in medical scales in order to hold the measurement indication.
Statistics

Statistics

Statistiscs function registers and analyses performed measurements. This supplies the user withthe following information: Max and Min standard deviation, average value, variance, range et.
Checkweighing

Checkweighing

Checkweighing function is used for checking whether the measured sample mass is within the predefined threshold values, Low [LO] and Hgh [HI]. The thresholds are given in [g] and [kg] units. Current state of a sample being measured is signalled by means of pictorgams located on a display for laboratory balances, for industrial scales Stackligt System is used. This visual +/- inspection is in operation during segregation, control or packing process of products for which mass has bees determined with a specifaied tolerance, eg. 12860 g 961
Under-pan weighing

Under-pan weighing

The solution enables weighing with use of a stand, which is advisable for loads of non-standard shapes and dimensions and those that generate magnetic field.
GLP Procedures

GLP Procedures

Diagnostic function allowing to objectively document performed measurements. GLP procedures may be either presented in a short report form or extended one.
Animal weighing

Animal weighing

Process of mass determination for a product which may unwillingly reposition within the weighing pan. Mass determination in such cases requires much longer period of time when compared to typical weighing process. It is the user who defines period of time needed for control of measured product mass. The user can thus optimize the function depending on the measured product characteristics.
Density determination

Density determination

Liquid or solid body density function uses the Archimedes principle and it requires a special kit to be applied. The kit when used, replaces a weighing pan. For solids mass of the sample must be determined first in the air, next in the liquid of specified density. For liquids the so called sinker, density of which has been determined, must be measured first in the air, next in the tested liquid. The density determination process is disturbed by air bubbles which may stick either to the measured sample or the sinker. In case of laboratory equipment very light solids may be measured. For industry, solid bodies density may be determined by means of  under-pan weighing. Tested load of significant size may be measured this way.
Documentation
Datasheet
Data Sheet Data Sheet
Data Sheet

Show me
Show me
Download
Download

Choose more product:
Show me Show me DownloadDownload
User Manuals
User Manual - R Series balances
Show me
Show me
Download
Download
(14.52 MB)
Conformity Declarations
Conformity Declaration
Show me
Show me
Download
Download
(0.04 MB)
Publications and Brochures
Principles of Metrology
Show me
Show me
Download
Download
(0.10 MB)
Laboratory balance cleaning
Show me
Show me
Download
Download
(2.52 MB)
RTP Thermal Receipt Printer
Show me
Show me
Download
Download
(1.64 MB)
USB Free Link - Direct Balance-PC Communication
Show me
Show me
Download
Download
(2.07 MB)
AS R2 PLUS Analytical Balance
Show me
Show me
Download
Download
(4.17 MB)
Alibi Reader - tutorial
Show me
Show me
Download
Download
(1.47 MB)
Laboratory Balances
Laboratory Balances
Show me
Show me
Download
Download
(1.68 MB)
Stainless Steel in RADWAG products. Standard and special applications
Show me
Show me
Download
Download
(2.23 MB)
Defined Weighing Profiles
Show me
Show me
Download
Download
(1.36 MB)
R Series balances
R Series balances
Show me
Show me
Download
Download
(4.98 MB)
Download
Drivers

RADWAG USB DRIVER 1.6.2 (1.25 MB)

Accessories
R-LAB

Accessories

Additional modules

RES Radwag Extended SI Module3
21 CFR Part 11 Compliance Module3

Newsletter

If you wish to receive the latest news about RADWAG products and services, sign up for the newsletter.

More
Radwag Balances and Scales
Torunska 5
26-600 Radom
Poland
tel.: +48 48 386 60 00
e-mail: export@radwag.com
TIN: PL7960000327
Vimeo Radwag YouTube Radwag Facebook Radwag LinkedIn Radwag
© 2024 RADWAG Balances and Scales. All rights reserved.

Select language

×
Change language AlbanianAlbanian
Change language DanishDanish
Change language NederlandseNederlandse
Change language EstonianEstonian
Change language FinnishFinnish
Change language HungarianHungarian
Change language IcelandicIcelandic
Change language KazakhKazakh
Change language LatvianLatvian
Change language LithuanianLithuanian
Change language MacedonianMacedonian
Change language NorwegianNorwegian
Change language PortuguesePortuguese
Change language RomanianRomanian
Change language RussianRussian
Change language SlovakSlovak
Change language SlovenianSlovenian
Change language SwedishSwedish
Change language UkrainianUkrainian
Change language SerbianSerbian
Change language MontenegrinMontenegrin
Change language page on Deutsch Deutsch
Change language page on Español Español
Change language page on Français Français
Change language page on Italiano Italiano
Change language page on Polski Polski
Change language page on Türkiye Türkiye
Česky
Português (Brasil)
Change website to USA USA
Change language page on 中文 中文
Presentations Presentations Presentations
Subscribe Subscribe Subscribe
Radwag in Facebook Radwag in Facebook Facebook
Radwag in YouTube Radwag in YouTube Youtube
Radwag in Vimeo Radwag in Vimeo Vimeo
Radwag in LinkedIn Radwag in LinkedIn LinkedIn
Webinars Radwag Webinars Radwag Webinars
close
E-mail:
Company name:
Name:
I consent to the processing of my personal data for marketing purposes by Radwag Wagi Elektroniczne Witold Lewandowski.
I consent to receive marketing and product-related messages by electronic means from Radwag Wagi Elektroniczne Witold Lewandowski.
I have read the Privacy Policy of RADWAG Wagi Elektroniczne Witold Lewandowski.
lock_openI want to access the files
close
Slide to go back ↩